Tuesday 30 October 2012

General De Brigade game 4

General de Brigade
Game 4, British v French
17th October 2012
This scenario was a suggestion by Ian which Brett set up and designed, representing a British rearguard action to block a French advance at a river crossing during one of the British frequent retreats from Spain when they had outrun their supply lines. The year is 1811. The river has one bridge and two shallow fords and the table is played lengthways.
Mission Objectives:
French – take river – victory
French – drive British from table – glorious victory
British – Hold majority of river – victory
British – break two French brigades – glorious victory
Special rules
The French, as the aggressor, automatically are the phasing player for the first three game turns.
No terrain features affect French movement in their half of the table. Bridge is no movement modifier. Fords are half pace but do not cause formation check. Crossing the river itself is one entire move but DOES NOT involve formation check. Charges may occur across bridge and ford subject to half-movement at fords.
Neither the French nor the British C-in-C may be classed as POOR. (We always dice for quality, it’s too much fun not too!!!)
Armies
The French significantly outnumber the British, as they should in this scenario. The French field three (bigger) brigades plus a cavalry brigade to the British two with one cavalry unit. The British are stronger in artillery.
Brett and Ian took control of the British rearguard, while Vincent and I took control of the French
 (Pre-deployment)


British
 C-in-C Picton – 60 points (Average) + 1 ADC (Average)
1st Brigade (Graham) 50 points (Excellent)
36 - 49th Foot (Northants) (line) (90 points)
36 – 5th Foot (Kent) (veteran) (108 points)
40 – 93rd Foot (Argyll and Sutherland Highlanders (elite) 140 points)
16 – 95th Rifles skirmishers (elite) (64 points)
Artillery 4 X 9 pounder Foot (veteran) (132 points)                                           Total 644 pts

2nd Brigade (Kempt) – 50 points (Average)
36 – 30th Foot (Cambridge) (line) (90 points)
36 – 69th (South Lincoln) (line) (90 points)
36 – 33rd Foot (1st West Riding) (elite) (126 points)
16 -  Cassadores (Portuguese) (veteran rifles) (48 points)                                  Total  354 pts
Cavalry regiment (Ponsonby) – 50 points (Poor)
18 – 18th Hussars (Elite – superior mounts) – 99 points                         Total 149 pts
Grand total – 1147 points


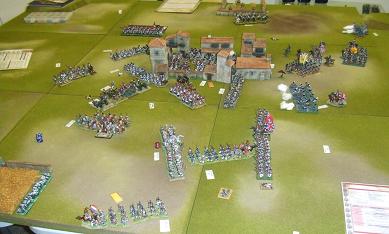
Having read the scenario, sorted sides, and seen the terrain, Brett and Ian deployed their two visible Brigades, keeping Ponsonby’s cavalry and the newly formed reserve brigade (the units in red) under Picton’s ADC somewhere behind the crest of the hill…(Where you can see them is where the French assumed they’d be!!!)
 The visible British Brigades started on “Hold Orders”, Graham’s 1st Brigade working from the left of the picture, the 5th Kent guarding the bridge with the 49th (Northants) on the ridge above the 95th Rifles, the 9 pounders centrally dominating the river valley.
Below the woods in the centre of the ridge is the 30th (Cambridge) Foot, with the 69th (South Lincoln on their left, the Portugese Cassadores arrayed in skirmish to their front.
Ponsonby’s Cavalry orders were to “Assault” any French crossing the river on the British left, the elite Infantry Brigade of the 93rd Foot (Argyll & Sutherland Highlanders) and the 33rd Foot (West Rising) reserve force would support the other brigades and assault French units that cross the river!
 

      British set-up above, French set-up below
French
C-in-CGeneral Foy – 60 points (Average)
1st Italian Brigade (Reille) – 50 points (Average)
36 X 2 (3rd Italian Régiment de ligne – Bataillons 1 & 2) (line) – (150 points)
28 X detatched Grenadiers (elite) – (84 points)
24 X Saxon infantry (veteran) – (70 points)
16 X Voltigeurs (veteran) – (40 points)                                                 Total = 454 points
2nd French Brigade (Quiot) – 50 points (Poor)
36 X 2 (86th Régiment de ligne – Bataillons 1 & 2) (line) (150 points)
36 X 1 (1st legere) (veteran) (108 points)
24 X Young Guard (guard) (132 points)
12 X Chasseurs (line) (14 points)
Artillery 3 X 6 pounder Horse Artillery (Elite) (129 points)                    Total = 583 points
3rd Württemberg brigade (von Hugel) – 50 points (Average)
36 X 2 (1st line Regiment “Prinz Paul”) (line) (150 points)
36 X 1 (4th line regiment “von Frenquemont) (elite) (110 points)
14 X Jagers (elite) (42 points)                                                               Total = 352 points
Cavalry Brigade (Nansouty) – 50 points (Average)
12 X Württemberg “Herzog Heinrich” Chevauxleger (line – inferior mounts) (42 points)
12 X Cleve-Berg lancers (Elite) (72 points)
Turn 4 - 12 X 3rd Dragoons (elite) (72 points)                          Total =  236 points
 Grand Total = 1625 points

 Having seen the initial visible “thin red line” deployed, the French decided against subtlety. Reasoning that two of the three crossing were required to “control” the river, the bridge and centre left ford crossing would be hotly contested being so close to one another, and undoubtedly where the British reserve would be positioned to defend. Therefore an all out attack across the river, with a bold right hook to sweep away the British left before converging on the centre was devised!
Nansouty’s Cavalry Brigade were ordered to cross the river on the extreme French right under the British line, “Assaulting” the British units there. Reille’s 1st Italian Brigade were under similar orders but were to cross the river at, and to the right of, the right hand ford. Under such force, the visible British left would surely crumble…or their reserves would be drawn out quickly!!!
Quiot’s strong 2nd French Brigade, with the Young Guard,Veteran 1st Legere and 6 pounders would “Engage” the British centre, crossing the river at the centre and centre left ford and keeping the British centre from reinforcing their embattled left, and being able to assist either flank if needed. Von Hugel’s smaller Wurttemburg, with the Prinz Paul Battalions and the elite Von Frequemont were to “Assault”cross at the bridge and to the left of it, to occupy the units the French assumed would be assigned to it from reserve. The “Prinz Paul” battalions would cross directly at the bridge to take the heat off the Von Frequemont as they crossed the river at the extreme left unmolested…

 After the French 1st turn, and all is going to plan…for both sides!!!
The first few turns were largely limited to the French columns advancing at pace and British limited to moving skirmishers to the fords. Although the British did politely inform us of a dust cloud behind the ridge, as they re-deployed their reserves having seen that the French General Foy had taken position at the right side of his army, where his cavalry was advancing at speed and his biggest and best brigades seemed to be…
First blood to the British, as the 9 pounders open up, targeting and un-forming the French limbered Horse artillery…

The 95th Rifles defend the central crossing…while the French Cavalry race ahead!!!


Turn four saw the first dice for initiative, the French winning and continuing their all  point attack…


            The British skirmishers with their longer ranged rifles have fallen back from the ford, their harassing fire largely ineffectual against so many French…Nansouty’s cavalry, consisting of the Wurttemburg “Herzog Heinrich” Chevauxleger and the Cleve-Burg Lancers are unsurprisingly the first French to cross, and draw out not only the expected 18th Hussars led by Ponsonby, but the elite reserve infantry… Picton seems to have outmaneuvered Foy with that, and the British and Portugese pour it on…


Turn five and initiative would be important for the first time…French maintain it, and Nansouty orders charges on the 18th Hussars and the 69th South Lincoln. However, the 69th firepower dissuades the Cleve-Burg Lancers from charging home, and poor dice leave the Wurrtemburgers to face Ponsonby unformed, resulting real trouble for the French cavalry brigade…


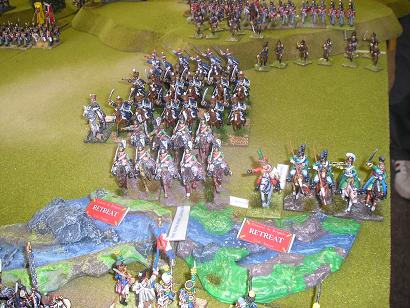
Reille’s Brigade advances across the river regardless of the calamity unfolding on their right, while the central and left brigades continue to advance on the British. Ponsonby’s cavalry are blown and will retreat to behind their lines to regroup but have massacred the French trapped at the river

The French centre right infantry under Reille cross at the ford, while Quiot’s brigade prepare to cross, with the Young Guard advancing into the ford, their skirmishers and artillery support peppering the stalwart British line on the ridges.

The British respond in kind, as the Wurttemburgers advance onto the bridge


Turn 6 sees the French hold the initiative once more, and Von Hugels Prinz Paul 1st Battalion on the bridge charge the British line…


Or would have had the sheer ferocity of the British line not driven them into retreat… Von Hugel galloped after them, desperately trying to restore morale, while the 2nd Battalion and Von Frequemont units cross unopposed and prepare to assault next turn


Meanwhile, flushed with Ponsonby’s successful charge and elimination of the French cavalry threat, the Highlanders surged down from the hill to oppose the right ford crossing, as the 95th on the right form up under the ridge to support the line…


As we entered turn 7, the game was nicely poised. The British had eliminated the French cavalry and had achieved numerical parity with the French on their left, foiling the French plan of a bold right hook. However, the French had unwittingly gained numerical superiority on their left and centre left, so planned to switch to a left hook. Initiative would be key, and the dice fell favorably for the French yet again…


The French attempted to change Quiot’s Brigade from engaging to assault, seeing the full British disposition of forces. However, perhaps it was due to the 9 pounders on the ridge, but the French general lost his nerve…


With only the brigade’s skirmishers across the river, this was an impending disaster for the French…


The French had little choice but to carry on the assault on both flanks, and pray that Quiot would soon gather his wits. On the French right, the Grenadiers charged the 93rd Foot Highlanders, and the elite Saxon infantry charged up the hill towards the 69th. The British Highlanders charged the Grenadiers, and the 69th remained in line and poured the lead on.

The Grenadiers win out just, as the Highlanders are pushed back, but the Voltiguers have to cover the retreat of the Saxons as they flee from short range musketry from the ridge as the West Riding have advanced to lend their support…
As the British held their left, with the only the Grenadiers looking threatening (as the 3rd Italian battalions still hadn’t fully crossed the river), and the French centre surprisingly going to Hold on the ford, the 30th Foot snaked down to cover the Highlanders pull back knowing that they would be taking canister from the French Horse artillery set up on the bend of the river

On the British right, the veteran 5th Foot pour it on as the Wurttemburgers try again…

As the 5th Foot fire, they step back, taking the Prinz Paul 2nd Battalion out of charge range, but still subjecting them to support volleys from the 95th and 49th on the ridge above. The Von Frequemont battalion had had to charge on their own initiative as Von Hugel rallied the 1st Battalion, which they duly did, and stormed the charge home despite stiff volleys from the British. The Wurttemburgers very nearly routed the 5th, but their nerve held as they retreated…


As turn 8 began, the French left was exposed, and in desperate need of support from Quiot’s Briagde. The British centre units had hinged left and right to support their flanks and a concerted effort there could ensure victory. The French right also was exposed, with the heavy British infantry presence there but the Grenadiers had an opportunity to flank the 30th Foot, unformed from French canister and with the Highlanders reforming and unable to support. The dice roll for initiative finally turned, the British winning for the first time

            As Picton instructed Posonby to take his cavalry to support the British right at the bridge, Foy had taken Quiot to task and he quickly ordered his men cross the river…

Of course, having left the right to cross to the centre, Foy had taken his eye of Reille, who had suffered with the Saxon infantry and in trying to reduce his brigades order from assault to engage the British at the ford, he panicked!!!

Following the frenetic command phase, and the melee the previous turn, there were no charges, primarily due to Reille. The British advanced Ponsonby’s cavalry up behind the ridge towards the bridge, while on the British left, the West Riding, Highlanders and 69th all advance on the French right at the right ford, under Pictons gaze

With the right now dropping to Hold orders, the Grenadiers were unable to charge, but the Italian Battalions secured the ford. The Prinz Paul 2nd advanced towards the retreating 5th Foot, finishing under the hill to avoid the worst of British musketry, and give the Von Frequemont cover as they reformed from their successful charge


In the centre, the relatively fresh brigade of Quiot’s crossed en masse, the 1st Legere to the right facing the depleted 30th Foot, the Young Guard central and one of the 86th Ligne on the left threatening the 49th Foot


The shooting phase was relatively uneventful, with the Young Guard taking some canister, as did the 30th Foot (again) but neither side was overly fazed. In the morale phase, the proximity of the Prinz Paul 2nd battalion stopped the 5th Kent from rallying, but the 30th Foot took new heart from their reinforced left flank. The Saxon battalion with Reille in attendance rallied too.
Turn 9 saw the British win initiative again. Ponsonby’s delay in re-ordering his horse meant that the 18th Hussars were just short of charging the Prinz Paul, so Graham led the 49th Foot as they prepared to charge in line, and the 30th Foot prepared to assault the 1st Legere.


The French in turn ordered the Young Guard to charge the artillery position on the hill, and the 86th Ligne attempted to charge the 49th, should they fail to press home.

The Prinz Paul 2nd Battalion try to repulse the 49th, which they do as the dice roll to charge home was double one, resulting in a shock retreat. The casualties the 30th Foot had accumulated meant they too were stopped by defensive volleys, holding in front of the 1st Legere and in canister enfilade of the French Horse artillery… The British artillery canister shot at the charge of the Young Guard was also low, the French charging home to disperse the guns from the ridge…


As the Young Guard and 86th Ligne storm the ridge, the 49th Foot retreat and the artillery disperse, the ever resolute 95th Rifles face the enemy unaware they are now surrounded

Reille’s Brigade hold the right ford, with the Voltiguers and Grenadiers across it, the 3rd Italian on it and Reille and the Saxons regrouped behind.


Ponsonby arrives too late to save the British right from a devastating turn of bad dice, as the Prinz Paul 2nd Battalion recross the bridge again, whilst the 3rd Dragoons arrive to find the left and centre crossings firmly in French hands


With the French controlling two crossings, and strongly holding the third, General Picton surveyed the battlefield from the British left, and began ordering the retreat…


The final positions, Von Hugels Wurttemburgers near the village and the bridge, Quiot’s brigade on the hill and centre left ford, and Reille on the right ford. The British had a strong left, with two small brigades that could probably have retaken the ford to their front, but Graham’s brigade on the British right would have failed its Brigade morale check (Ian did roll) had Ian and Brett not agreed the game was lost beforehand.

Another excellent game that swung to and fro, with three double ones at crucial times, and it was a classic example of how “no plan survives contact with the enemy”.

The British (Brett & Ian) anticipated the French would attack strongly at one point and surmised that would be down their left. However, Vincent and I decided to try and attack on both flanks, and use the centre to reinforce success. Admittedly our right was the strongest, and the left intended as diversionary but it turned out to be the most successful as the British didn’t have the numbers to contain it. The valiant and futile French cavalry crossing was very costly but it did draw the British reserves into view and the French pressed home on the left, despite the centre’s loss of nerve…

With hindsight, we all agree that the rules for crossing the river were probably not right, as stopping at, then crossing fully next turn made it one turn to cross. Next time we will try stopping at it, move half unit across and be unformed (and more vulnerable), then cross fully on the next turn, so two full turns to cross fully. But that shouldn’t detract from an excellent game of General de Brigade, that really could have went either way!!!

Sunday 1 April 2012

2nd Game of GdB

Encounter Battle in Spain, Spring 1811
“The year is 1811. A French force and a British force are on a collision course towards the village of Pueblo Cajones. Both commanders have instructions to take possession of the strategically important hamlet. Neither is aware of the approach of the other, and both forces are strung out in a divisional march towards the settlement, so neither commander is exactly sure when his forces will arrive...”
Brett, Chris and myself played a “what if scenario” for our second game (Chris’s first) in the same manner as our first, relatively open and transparent, as we are still learning the rules (and making glaring tactical errors). As there were three of us, Brett was happy to assist Chris while effectively umpiring and rules checking, while Chris and I took main control of the British and French respectively.
Brett put this nice little scenario together, with a straightforward objective (the Village of Pueblo Cajones with troop capacity of 80) but with a high degree of uncertainty with regard to arrival and position of reserves. It also pitted a larger French force of average quality against a smaller but better quality force of British. Both forces started with an advance scout force deployed so we had something to play with (and who could re-join a parent brigade when they arrive) while we awaited our main force, which would (or should) start to show up one brigade at a time from turn 2 (on a 6+), turn 3 (5+), turn 4 onwards (4+), and in a random part of the board edge.
British Picket consists of: ADC (Poor), 14 Elite 95th Rifles (in the village), a Hussar Squadron and 2 6pdrs from Royal Horse Artillery
French consists of: ADC, 24 Veteran Voltigeurs, a Hussar Squadron and a 6pdr Horse Artillery

The main forces were taken from the Battle of Barrosa, March 1811. We randomly rolled for commander quality, which were all average bar one poor per side (the British ADC and the Brig Gen of French large Grenadier...
The French Forces
CiC: Marshal Victor
1st Brigade: Ruffin
9th Legere (30 Figs, Veteran), 24th Line (2 x 24 Figs, Line), 96th Line (2 x 30 Figs, 2nd Line)
2nd Brigade: Leval
45th Line (30 Figs, Line), 8th Line (2 x 30 Figs, Line), 54th Line (2 x 30 Figs, 2nd Line)
3rd Brigade: BG (Poor), Provisional Grenadiers (30 figs, Veteran)               
4th Brigade: Provisional Grenadiers (24 figs, Veteran)
5th Brigade: Lamotte 1st Dragoons (14 Figs, Line, inf mounts)
6th Brigade: Divisional Artillery (3 x 6pdr, Line)
The British Forces
CiC: General Graham
1st Brigade: Wheatley
28th Gloucesters (24 figs, Line), 67th Hamptonshire (30 fig, Line), 87th Prince o Wales Irish (30 fig, Line)
2nd Brigade: Dilkes
1st Foot Guards (40 figs, Guard), 2nd/3rd Foot Guards (30 figs, Guard), 95th Rifles (10 Figs, Elite)
3rd Brigade: Barnard.  Light Battalion (40 figs, Veteran)
4th Brigade: Browne. Light Battalion (24 figs, Veteran)
5th Brigade: Whittingham. KGL 2nd Hussars (10 figs, Elite)
6th Brigade: Duncan, 9pdr RA Foot Battery (3 model guns, Line)


Turn 1: The battle began quietly, with both sides having no reserve rolls until turn two. The French won initiative, and the Voltigeurs advanced centrally to engage the 95th Rifles in the town, the Hussar squadron escorting them on their left while the artillery moved into position on the French right. The British Hussars advanced on their right to threaten the Voltigeurs and French Hussars, with the RHA moving rapidly to support them. The 95th waited patiently in the village.

Turn 2: The French win initiative and in rolling for reserves, both sides must have had their artillery to the van, as that was the brigades they managed to get on. Both deployed randomly against one another, the French ideally positioned to follow up the one gun picket and form a four gun battery, the British 9 pdrs on their left giving them artillery on both flanks. Both sides picket forces advanced on the village.
Turn 3: The French win initiative and managed to get a brigade on, five infantry battalions in mass column forming Leval’s 2nd Brigade, who arrived centrally and were assigned orders to assault enemy forces in the village and then hold it. For the British, Gilkes arrives with the 2nd Brigade consisting of Guards and the remaining 95th Rifles, arriving on the British left. They were duly ordered to move and hold the village. The Voltigeurs advance into musket range and open up on the 95th, picking off one of England’s finest, while the flanking Hussars squadron move up to counter-charge the British Hussars should they charge the skirmishing French. The 95th return fire, ineffectually.

The view from the French left: Infantry reinforcements arrive for both sides on turn 2

Turn 4: The British gain initiative for the first time. However, Ruffin’s 1st Brigade arrives for the French, another 5 battalion strong column, on the French right with orders to engage the British guards division that had just came into view.
The British Hussar squadron (with attached poor ADC) declared a charge against the Voltigeurs. The French Hussar squadron declared a counter-charge (but couldn’t as they weren’t in charge range...I thought they charged and intercepted at half-way but that’s not the case and they weren’t in charge range to begin with) The Voltigeurs elected to stand and shoot, and picked off a charging Hussar. The British Hussars pressed home and swept through the skirmishers, taking out six and bursting through straight, ending in front of the mass column of Leval’s 2nd Brigade.  The French mass their artillery and change order to engage the British 2nd Brigade


Turn 5: The British maintain initiative and get reinforcements in the form of the KGL 2nd Hussars arriving on the British left, quickly being despatched to assault and delay Ruffin’s Brigade. The French don’t get any. The remnants of the Hussar squadron try to go out in style, but fail to press home on the column, retreating in disarray. The 95th Rifles of Dilkes Brigade reach the edge of the village, ready to reinforce their comrades, with the 2nd/3rd Foot following close behind. The 2 6pdrs of the RHA limber up to advance and enfilade the  French columns. However, as the Voltigeurs move around the village, three columns from Leval’s French Brigade move up and into charge range of the village, attracting sporadic fire from the 95th within.
View from French right, as the French columns approach to musketry/rifle range of Pueblo Cajones (The 2nd KGL Hussars are just off camera top right)


Turn 6: The French win initiative and get Lamotte’s 5th Dragoons from reserve, on their left, ideally placed to threaten the British Royal Horse artillery. The British get Browne’s 4th Brigade, again down on their left with order to move to the village. The French artillery change orders to engage the 2nd KGL Hussars, and Leval’s Brigade, with CinC close by, charge 3 battalions, in mass column, into the British 95th Rifles in the village…until two disastrous charge home results and a failed formation test.


The 95th Rifles can’t believe their luck, as the French columns become entangled and fail to charge home, while the rest of the lads arrive to reinforce them. The picket squadron of Hussars swing round to threaten the faltering French 2nd Battalion of the 8th Line. The French respond by bringing their 1st Dragoons up to threaten the Hussar squadron.


Turn 7: The French gain initiative and gets the 4th Brigade for reserves on their right, following on the heels of the 1st Brigade. The British don’t receive any. The French Dragoons get the charge on the Hussar squadron who boldly counter charge and get wiped out. The Dragoons get superb discipline and will be in charge range of the RHA next turn. One battalion of the 54th Line assault the village, and despite what befell the majority of the Brigade earlier, push home their charge. However, the 2nd KGL Hussars are just in reach of two French battalions and gallop forward. The 24th Line successfully form a regimental square but that doesn’t deter the KGL cavalry pressing home.
The French column of 54th Line not engaged move up to enflank the village on the left, while the remainder of the brigade reform. The British 2nd/3rd Foot Guard move into the village, while the1st Battalion are lining up in position with the 9pdrs to prevent the French 1st Brigade attacking the village on the British left. In melee, the 54th Line battalion valiantly push back the 95th Rifles in the fight for the village (though we weren’t sure we resolved it correctly, as we didn’t involve the British 2nd/3rd Guard who had just moved in but hadn’t occupied it). The cavalry charge of the 2nd KGL Hussars was soundly beaten by the 24th Line in square!
Turn 8 No reserves, and French initiative again. The 1st Dragoons charge the RHA who evade. The 8th Line Regiment in two columns assault the village (Not in mass column as the 45th Lin decide not to get in the way!) adding their numbers to the melee which has been further increased by the British in the 2nd/3rd Foot Guards. The French 24th Line reform to column as the are overtaken by the 9th Legere and the rest of the 1st Brigade pull alongside. The Voltiguers don’t fancy being to close to the British 9pdrs but have no orders to move away from the village. The British 4th Brigade rushes to try and reinforce the battle in the village.
In the battle for Pueblo Cajones, the French numerical superiority meant that although they were pushed back as the quality of the Guard and Rifles showed, the French casualties weren’t felt as acutely as the British. The 95th Rifles were nearing half strength, and the Guards battalion was greatly reduced, and the French had two columns to reinforce the battle next turn.


Turn 9 The British get initiative and get reserves in Barnard 3rd Brigade. The French get their last brigade, Grenadiers of the 3rd Brigade on the left flank. They are ordered to move and engage enemy forces behind the village. The French Dragoons successfully changed orders to assault the British behind the village and swung round to threaten the British 4th Brigade who had moved up ready to enter next turn. The Dragoons were letting the RHA battery enfilade them, but felt the risk worth it. The 2nd KGL, despite having lost 50% of their force swept round to charge the 9th Legere, who formed square. The 2nd KGL Hussars failed to press home, faltering in front of the formation…but the square was in effective 9pdr range. Three French columns assaulted the village again (not in mass column having learned how badly that failed), vastly outnumbering the defending British, pressing home into melee. The 9pdrs of the British targeted a column of the French 1st Brigade, trying to stall its advance on the town but did limited damage.

A view from the French centre as they close in on 3 sides of the beleaguered British forces…
The only melee saw yet another valiant display by those “stubborn fellows” of the 2nd/3rd Guards and 95th Rifles, preventing the French winning outright but allowing them a foothold in the village.


Turn 10 The French win initiative and the British finally get their final reserve on, as the 1st Brigade to arrive. The 1st Dragoons charge Brown’s Light Battalion at the village rear, who successfully reform to square. The 24th Line first battalion successfully assault the 1st Foot Guards in line, to occupy them
In melee, the 1st Dragoons are repulsed by the British 4th Brigade in square, the 24th Line 1st Battalion are totally outclassed and routed by the 1st Foot Guards, causing the 96th battalion to falter

But the French finally force out the valiant 95th Rifles and British Guards (down to 21% strength and 50% respectively but still not dispersing) and storm into the village
Turn 11 The British forces won initiative. The 1st Battalion Foot Guards charge the 24th Line 2nd Battalion who hold to give the faltering 96th battalion behind a chance to regroup. The British bring up their reserves towards the village, while the French consolidate their grip on it, preparing to engage with their superior numbers. The Foot Guards surprisingly only push back the 24th Line, leaving themselves exposed in the face of a 4 gun battery and superior French numbers

Turn 12 The British win initiative again but have no units available to charge. They decide to mount a defensive line just outside the village, with their fresh reserves supporting the retreat of the shattered remnants of the 95th and 2nd/3rd Foot Guards, which the French, with their superior numbers, troops safely ensconced in the village and grenadiers advancing down both village flanks, are happy to let them do, engaging with musketry.
We called it a day there after another great day of gaming. We deemed victory went to the French. The British had been forced out of the village and would have struggled to retake it although both forces still had a several undamaged units. However, the French had firm control of the village and had secured a tactical victory. We all agreed they won it due to better luck with reserve rolls, reserve timing and positioning (The 1st Dragoons in particular) and sheer weight of numbers. Had the British 1st Brigade been less shoddy in their march, their numbers would have been able to get in and around the village and make it far more of an even contest. That being said, it was an impressive performance by the 95th Rifles and 2nd/3rd Foot Guard repeatedly fending off French assaults on the village. These two British battalions (combining less than 50 figures when they were both in) held off five French battalions, containing three times the number of figures for five turns. 
The 95th Rifles and 2nd/3rd Foot Guards held the Pueblo Cajones valiantly for 5 turns